Ever since starting out on my learning journey with Packer and writing my ‘Getting Started’ blog series, I have not stopped learning and developing my templates. I have also learnt a lot from other members of the tech community, such as @mpoore, as well as discovering this repository - vmware-samples. I really wish I had found this sooner than I did, as its a great resource! It was especially useful to me for Linux examples. That said, its been great taking my own learning journey.
Since writing the series, I have made numerous changes to my template code, structure and added additional functionality and OS’s. But I have also spent some time working with Azure DevOps Pipelines for another piece of work. This got me thinking…
In this blog post I want to show you something that I have put together using Azure DevOps Pipelines and Packer.
Overview
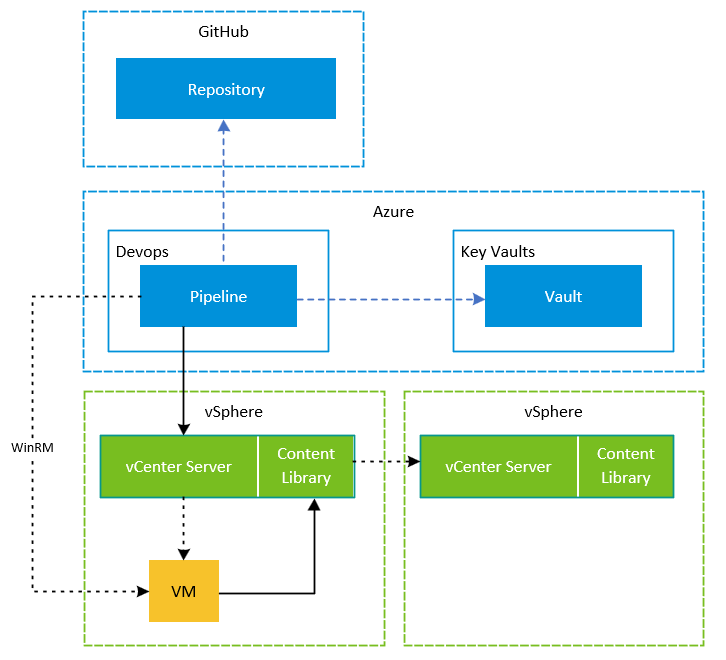
This solution makes use of Azure DevOps Pipelines, Azure Key Vault and HashiCorp Packer to schedule and orchestrate the building of new virtual machine templates in VMware vSphere.
Azure Pipelines will be used to orchestrate the secure retrieval of secrets from Azure Key Vault using the native integration and executing the Packer commands to build the required template. By using these together, we can ensure all secrets are securely utilised within the build.
I will be using a Self Hosted DevOps agent as part of this to allow communication between Azure DevOps and the private networks in my on-premises lab. This is instead of using a Microsoft Hosted DevOps agent which is in a public shared address space.
As mentioned, Azure Key Vault is going to be used to store the secret values for things like service accounts for vSphere access and administrator passwords for the Guest OS etc. These can retrieved within a pipeline, which is granted access to these secrets and made available as variables to be consumed.
Each template will have its own pipeline. This means individual templates can be called via API allowing for some other interesting use cases and automation.
As is the case in the blog series, all templates are uploaded to the vSphere Content Library which can then be subscribed too from other vCenter Servers.
Components
-
GitHub Repository (Packer Code)
-
DevOps Project
-
DevOps Pipeline
-
On-Prem DevOps Agent (Virtual Machine)
Prerequisites
-
GitHub Repository with your Packer code (Example here)
-
A functioning vSphere environment
-
An Azure & DevOps Subscription / Account
-
An Azure Key Vault (With appropriate networking configured)
-
A Virtual Machine (Windows 2022 Core in this example)
-
AD User Account (To run the DevOps Agent as a service) *can use the system local account if you wish.
Packer Code
If you aren’t familiar with Packer, I would suggest taking a look at my blog series on Packer here, but I will briefly go through some key differences of the newer code that you can find here, which the blog is based on. At the time of writing I have only added Server 2019 & 2022 but I will be adding to this over time.
Firstly the file structure is now a little different. This was inspired by the vmware-samples repository linked earlier, and some of my own preferences from actively using Packer.
-
Shared answer file templates with parameters for all Windows Operating Systems to reduce repeating files.
-
Single .pkrvars.hcl for each Operating System which includes both Standard & Datacenter Editions as well as Core and Desktop options.
-
The Build file includes a dynamic creation of the answer file based on variables from a template file. (this is great!)
-
Cleaner variable naming.
-
The Windows Update Provisioner is now controlled using the required plugin parameters.
Another key difference is how sensitive values such as usernames, passwords and keys are now passed into the configuration. These are now retrieved from Azure Key Vault by a Pipeline task and passed into environment variables (PowerShell) which are then consumed as any other variable would be. The key benefit is that the secrets are securely stored and accessed by the pipeline!
Check out the Azure Key Vault section later in the post for more information on secrets and their consumption.
DevOps Project
First lets create a DevOps Project by heading over to dev.azure.com and clicking on New Project.

Provide a name for the project and select the Private option.

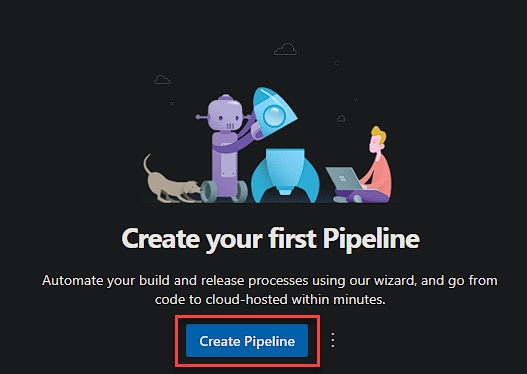
Now time to create the first pipeline. As mentioned earlier, we will be using a pipeline per operating system.
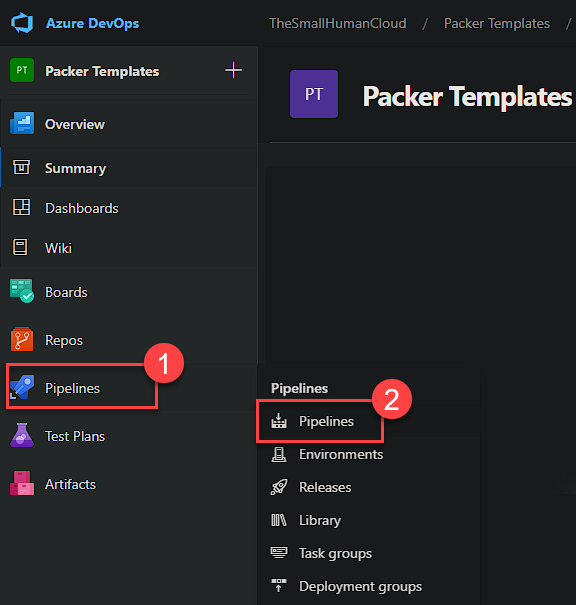
Select Create Pipeline.
You will then be asked to select the location of your code. I will be selecting GitHub as that is where I keep my code.
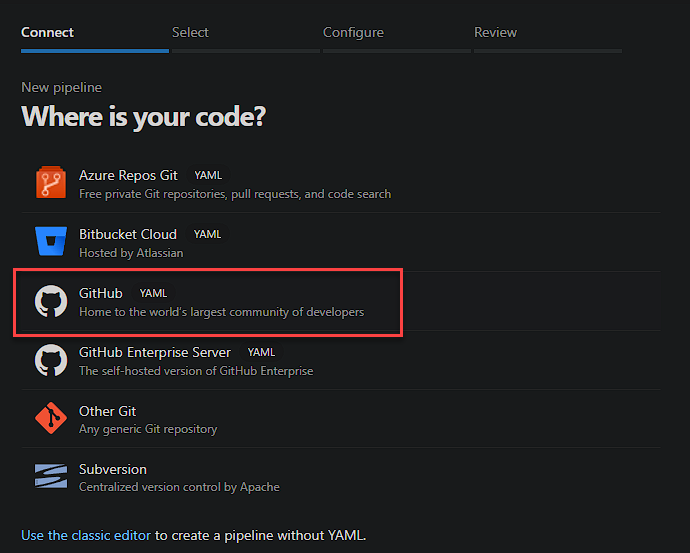
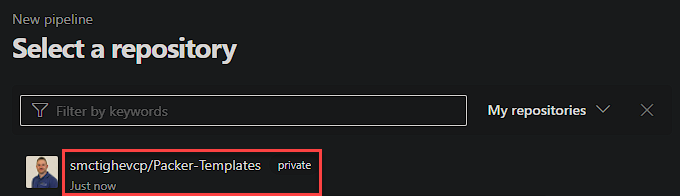
Followed by the repository that contains your Packer Code.
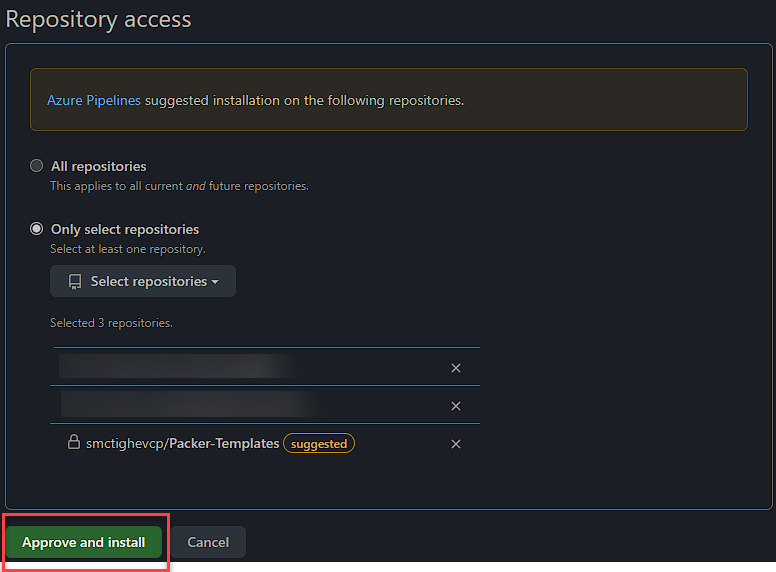
Next you need to provide and approve access for Azure Pipelines to the repository you selected.
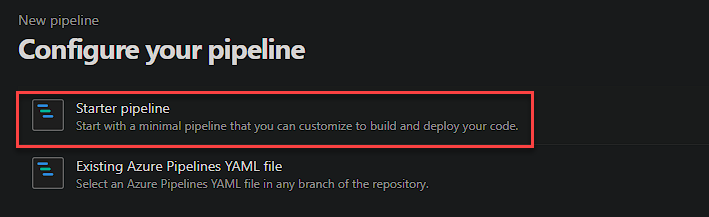
Now to create the first pipeline YAML file. Select Starter Pipeline.
First of all rename the file to the name of the template you are going to build. In this example lets call it ‘windows-server-2022-standard-core.yml’. You can do this by clinking the existing name.


Now you want to add the code for this template build. You can use the examples from here.
You could of course take the examples from my GitHub and select ‘Existing Azure Pipelines YAML file’ rather than ‘Starter pipeline’ if you wish.
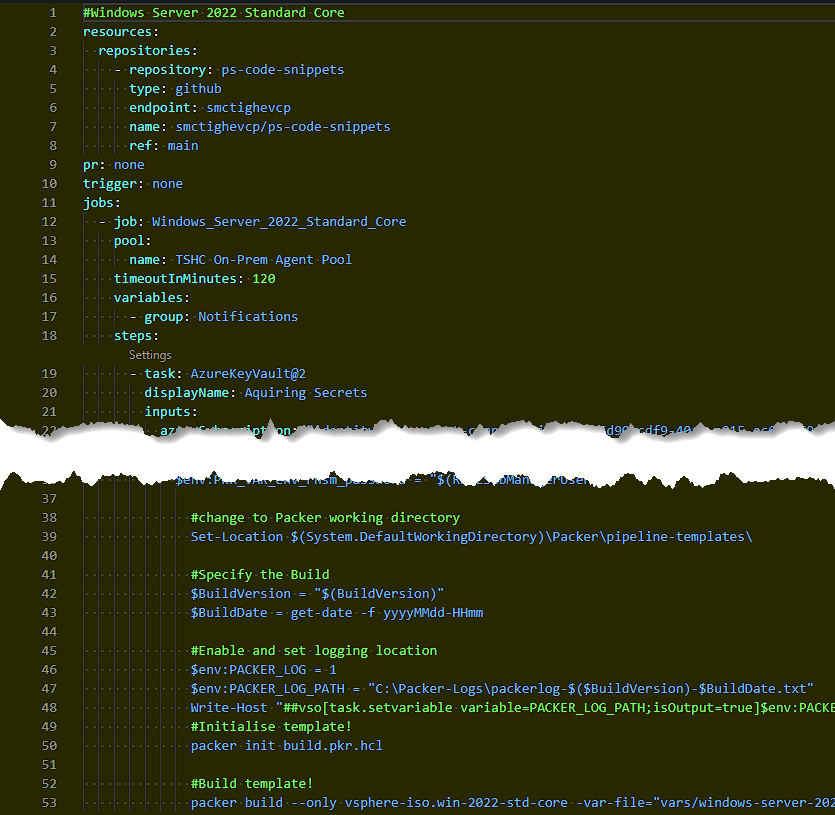
Lets now briefly explain what this code is doing:
1resources:
2  repositories:
3    - repository: ps-code-snippets
4      type: github
5      endpoint: smctighevcp
6      name: smctighevcp/ps-code-snippets
7      ref: main
Here we start by referencing a different central repository which contains reusable code. A good resource to understand this bit is linked here.
1- checkout: self
2- checkout: ps-code-snippets
We also have a ‘checkout’ references. These instruct the pipeline to checkout not only the source repository, but also the additional one that contains reusable code.
1schedules:
2   - cron: "0 0 15 * *"
3     always: true
4     displayName: Monthly Schedule
5     branches:
6        include:
7          - main
This section is setting a schedule to run at midnight every 15th of the month. This can be adjusted to suit your needs. More information about setting cron schedules are here.
1 pr: none
2 trigger: none
As we want to run the Pipelines either on a schedule or manually, we want to disable the CI/CD integration. We do this by setting the pull request (pr) and trigger options to ’none’.
1jobs:
2   - job: Windows_Server_2022_Core
3     pool:
4      name: On-Prem Agent Pool
5     timeoutInMinutes: 120
6     variables:
7      - group: Notifications
This section defines a couple of parameters for the job. Firstly the name of the job as well as the name of the On-Prem DevOps agent pool we will be using (See the next section). Finally a timeout value. By default this is 60 minutes for self hosted agent jobs which isn’t quite long enough for the Desktop Edition of the OS in my lab. There is also a reference to a variable group. These are groups of variables that can be consumed by any Pipeline within the DevOps Project.
1- task: AzureKeyVault@2
2          inputs:
3            azureSubscription: 'identity-management-connectivity(a949****-****-****-****-************)'
4            KeyVaultName: 'kv-******-main'
5            SecretsFilter: 'vSphereAdmin, vSphereAdminUser, GuestLocalAdmin, GuestLocalAdminUser, PipelineNotificationsTenantID, PipelineNotificationsAppID, PipelineNotificationsAppSecret'
6            RunAsPreJob: false
Next we are using a built in Pipeline task to retrieve secrets from an Azure Key Vault. I am then filtering it to the specific secrets required. You could replace this with ‘*’ if you don’t wish to filter them. Access to these are secured using RBAC later.
 1#change to Packer working directory
 2                Set-Location $(System.DefaultWorkingDirectory)\pipeline-templates\
 3
 4                #Specify the Build
 5                $BuildVersion = "$(BuildVersion)"
 6                $BuildDate = get-date -f yyyyMMdd-HHmm
 7
 8                #Enable and set logging location
 9                $env:PACKER_LOG = 1
10                $env:PACKER_LOG_PATH = "E:\Packer-Logs\packerlog-$($BuildVersion)-$BuildDate.txt"
11
12                #Initialise template!
13                packer init build.pkr.hcl
14
15                #Build template!
16                packer build --only vsphere-iso.win-2022-std-core -var-file="vars/windows-server-2022.pkrvars.hcl" .
17
18               #Build Email Content
19              $out = select-string -path $LogPath -pattern 'ui:'
20              $EmailContent = $out.line -replace '(?<Date>[0-9]{4}/[0-9]{2}/[0-9]{2} [0-9]{2}:[0-9]{2}:[0-9]{2})','__${Date}' -replace'__',"<br />" -replace "[ ]+ui:[ ]+","`t" -replace "vsphere-iso.win-2022-std-core: ", "" -replace "==> ", "   "
Now we move onto the more familiar Packer and PowerShell code (if you are already a user of Packer). This sets a couple of variables to use in the log files, enables logging and initiates the build. It then begins to populate a variable that has taken the information from the log file and cleaned it up to consume in an email notification in the final steps.
Something you may need to adjust is the Set-Location path. Its using a built in variable which is the root of the GitHub Repository: $(System.DefaultWorkingDirectory). Make sure you adjust the remain path to match to location of your Packer configuration.
1                $EmailBody = ('<HTML><H1><font color = "#286334"> Notification from The Small Human Cloud - Packer Virtual Machine Templates</font></H1><BODY><p><H3><font color = "#286334">Build Name:</H3></font></p><p><b>$(BuildVersion)</b></p><p><H3><font color = "#286334">Pipeline Status:</H3></font></p><p><b>Build Reason:<b> $(Build.Reason)</p><p><b>Build Status:<b> $(Agent.JobStatus)</p><p><H3><font color = "#286334">Packer Log:</H3></font></p><p>Please Review the logfile below for the build and take appropriate action if required.</p>')+("<p>$EmailContent</p>")
2                Set-Location $(System.DefaultWorkingDirectory)
3                . '.ps-code-snippets\Send-Email.ps1'
4                Send-Email -TenantId "$(PipelineNotificationsTenantID)" -AppId "$(PipelineNotificationsAppID)" -AppSecret "$(PipelineNotificationsAppSecret)" -From "$(From)" -Recipient "$(Recipient)" -Subject "$(Subject)" -EmailBody $EmailBody
This final section makes use of a PowerShell function based on the Azure Graph API that you can find details on here, to send an email notification via O365. It is taking the content of the function from a separate repository and loading it into the session to then run.
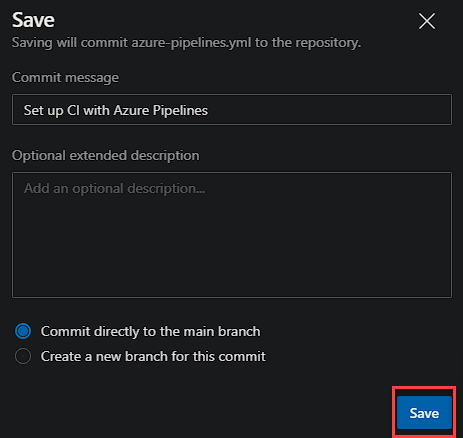
Now select the drop down next to ‘Save and run’ and click Save.

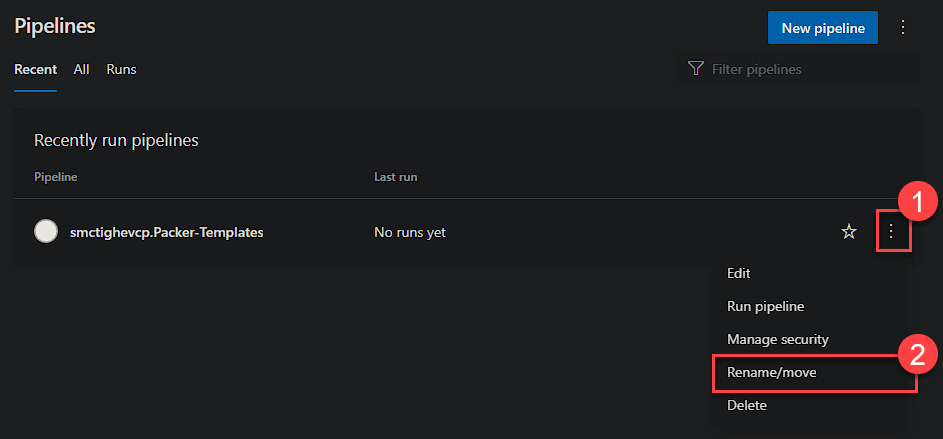
We want to rename the actual Pipeline to the template name. Head back to the Pipelines menu, click the 3 dots and select ‘Rename/Move’. Give it the same name as your YAML file for consistency.
Variable Groups and Pipeline Variables
We mentioned earlier the reference to a variable group. These are configured per DevOps Project and can be used by multiple Pipelines. I am using one specifically for the values used for email notifications. They are a great way to reduce duplicating variable declarations.
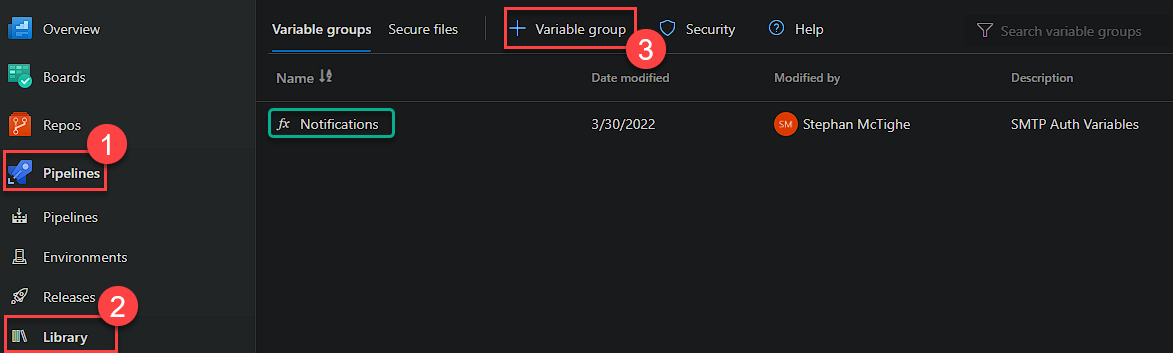
You can set these by heading to Pipelines > Library and then clicking ‘+ Variable group’. You can see my group called ‘Notifications’ already created.
1     variables:
2      - group: Notifications
We then need to grant the Pipeline permissions to this variable group. You will need to add any Pipeline you want to have access to these variables.
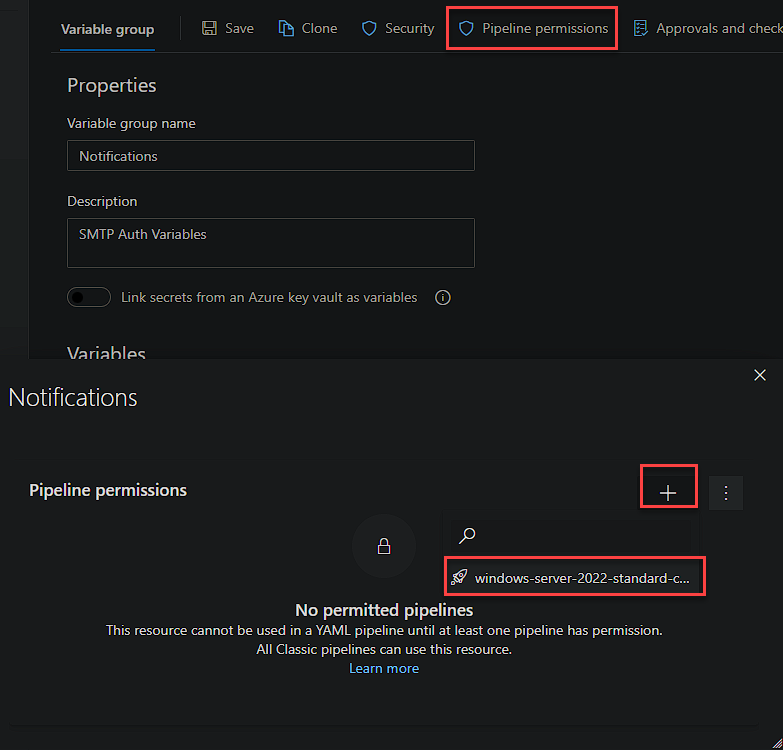
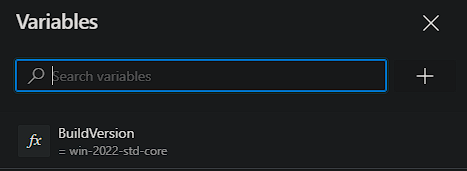
There is another way of providing variables to a Pipeline and that is a Pipeline Variable. These are configured per Pipeline and are not available to other Pipelines. I am using this to create a ‘Build Version’ variable that is used for the log file name.
Azure DevOps Agent
We need to build our self hosted DevOps Agent that we referenced in the ‘pool’ parameter in our configuration earlier. This is going to be a virtual machine on my on-premises vSphere environment. I will be using a Windows Server 2022 Standard Core VM called ‘vm-devops-02’ that I have already built on a dedicated VLAN.
To start the config, we need to create an Agent Pool. From the Project page, select ‘Project Settings’ in the bottom left.

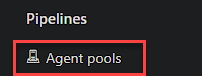
From the tree on the left under Pipelines, select Agent Pools.
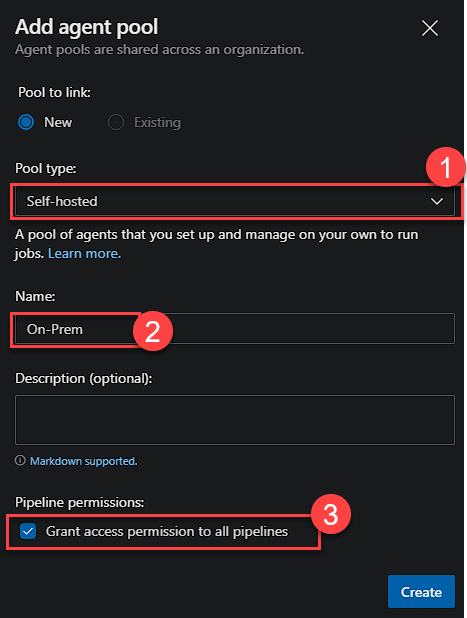
Now, select Add Pool, and complete the required field as below, editing the name as desired, but you will need to match it when you reference the pool in your YAML.

Now to add the agent to our on-premises VM. Select ‘New Agent’

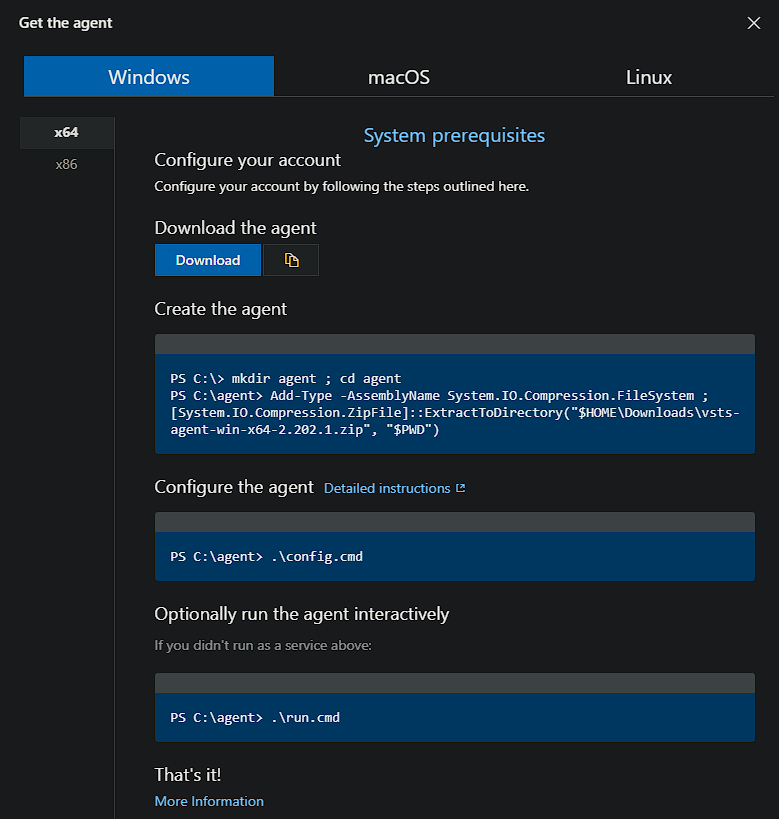
Download the agent using the Download button and then copy the ZIP file to the VM to a directory of choice. You can use PowerShell for this:
1$SESSION = New-PSSession -ComputerName vm-devops-02.smt.com -Credential (Get-Credential)
2Copy-Item -Path "C:\temp\vsts-agent-win-x64-2.202.1.zip" -Destination "C:\" -ToSession $SESSION
Then using the commands from the agent configuration window, run the command to extract the files adjusting the file paths as required:
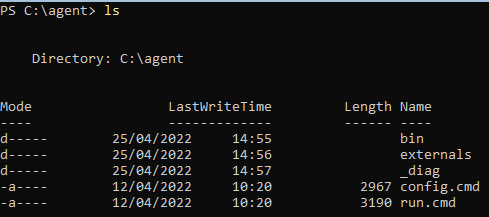
1Add-Type -AssemblyName System.IO.Compression.FileSystem ; [System.IO.Compression.ZipFile]::ExtractToDirectory("C:\temp\vsts-agent-win-x64-2.202.1.zip", "$PWD")
You are then left with something like this:
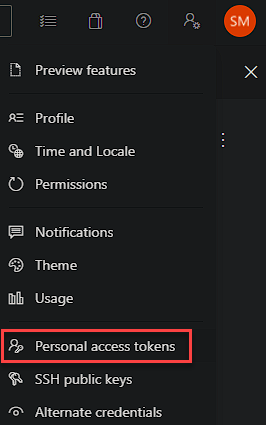
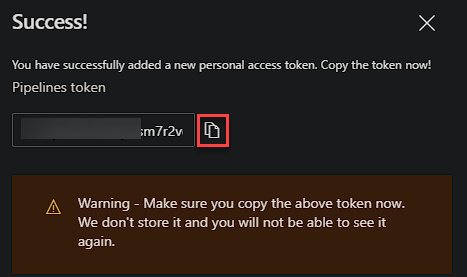
Now before we run the configuration file, we need to create a PAT (Personal Access Token) for use during the install only, it doesn’t need to persist past the install.
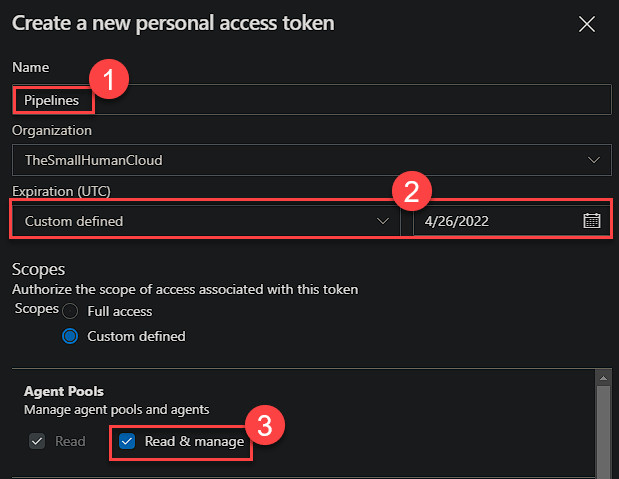
You will then need to make a note of this token for use later!
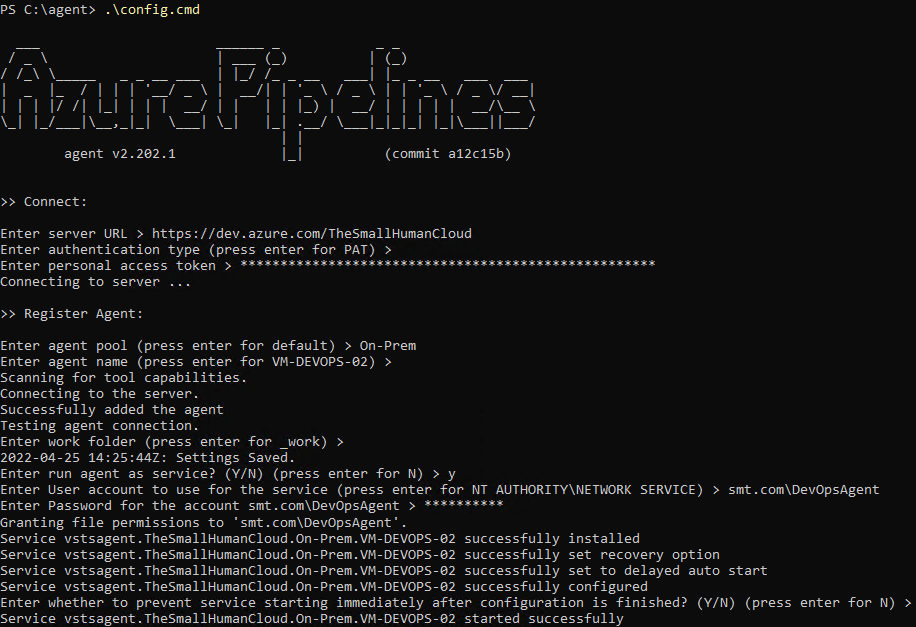
Now run the configuration script:
1.\config.cmd
You will then be presented with a set of configuration questions (Detailed instructions here):
You will need your DevOps Organisation URL, PAT Token and an AD (Active Directory) account to run the Agent service under. As mentioned, you can use the NETWORK SERVICE if you wish.
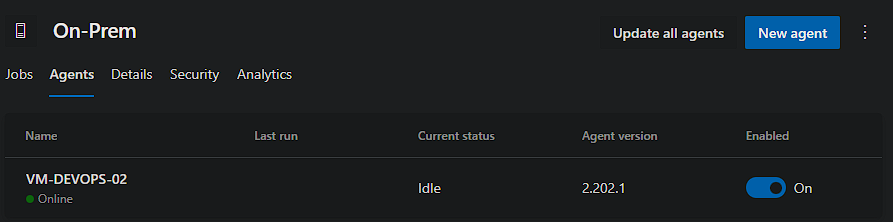
Now if we head back over to the Project’s Agent Pool, you will see its active!
I am using service accounts within the Pipeline to access the vSphere environment etc, so I don’t need to give the agent service account any specific permissions. More information can be found here.
Depending on your environment you may need to configure a web proxy or firewall access for the agent to communicate with Azure DevOps.
Finally, you will need to ensure the Packer executable is available on the DevOps agent server. See my past blog for more information.
That’s the Agent setup completed.
Authorizations
Now we need to authorise the DevOps project to access the Key Vault we plan on using. The quickest and easiest way is to do this is to edit the Pipeline and use the Azure Key Vault Task Wizard to authorise, but this isn’t the cleanest way.
You can create the Service Connection manually. This allows for further granularity when you have multiple pipelines within the same project that require different secret access.
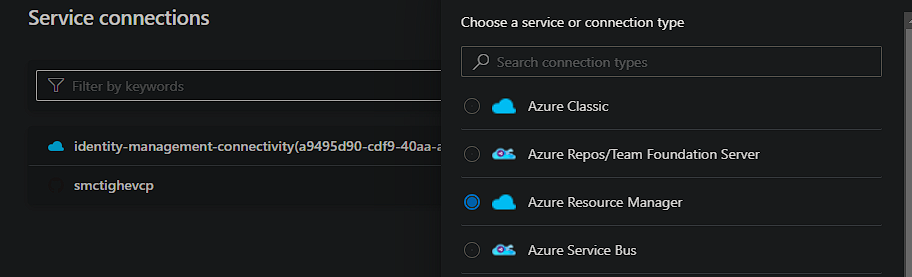
You can do this by heading to into the Project Settings and then Service Connections.
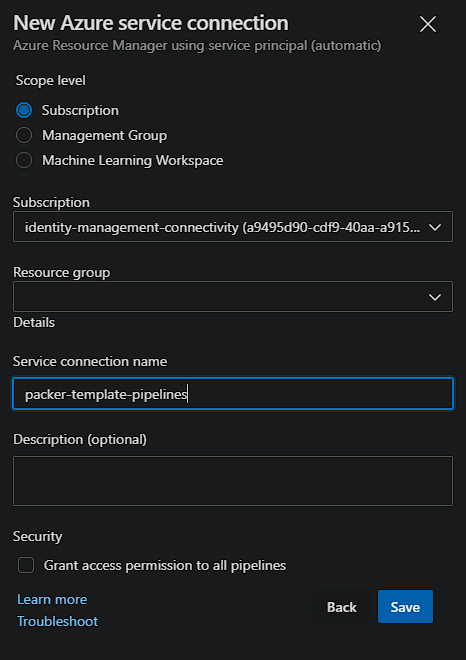
When selecting new, choose the Azure Resource Manager type, followed by Service principal (automatic).

You then need to select your Subscription and provide it a name.
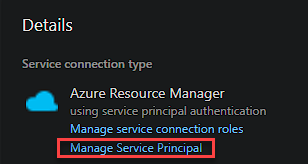
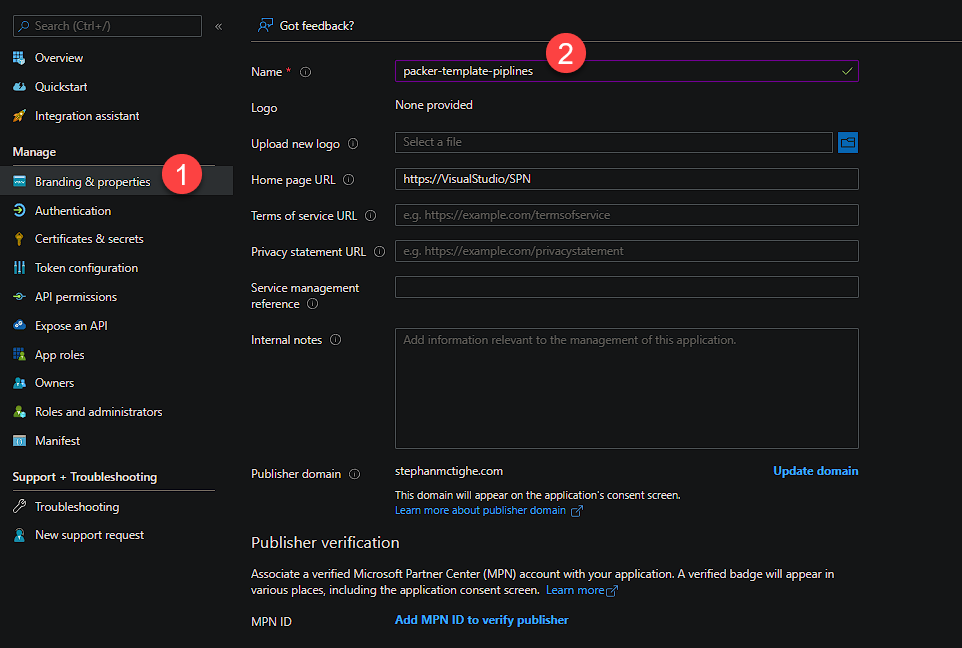
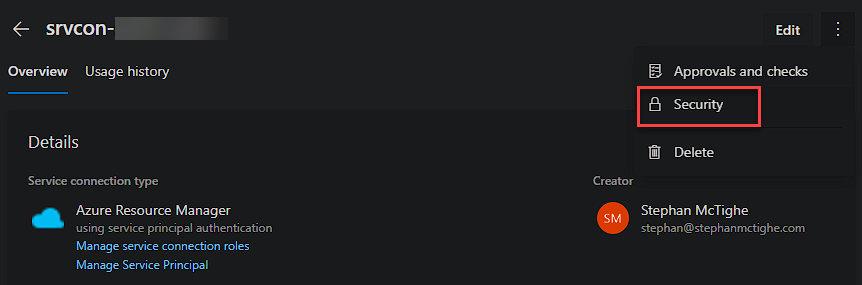
Now head over to Azure to match the name of the Service Principal in Azure with the Service Connection from DevOps. To do this select the Service Connection, and then Manage:
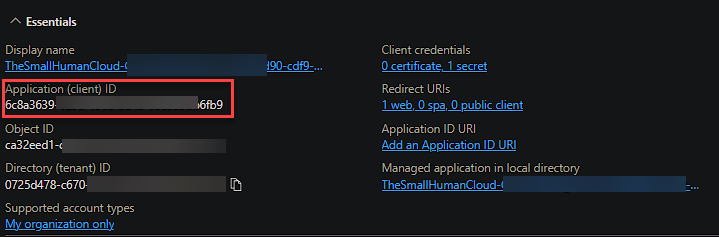
You are going to need the Application ID of the service connection to be able to assign permissions to secrets using PowerShell. Grab the Application ID from the Overview tab as well as your subscription ID for use with the New-AzRoleAssignment cmdlet.
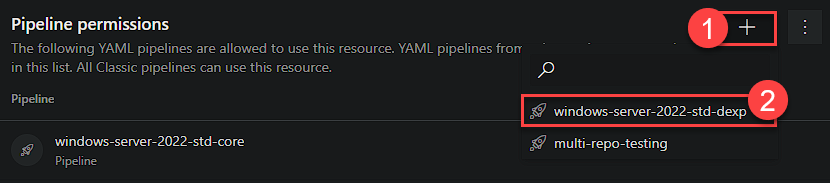
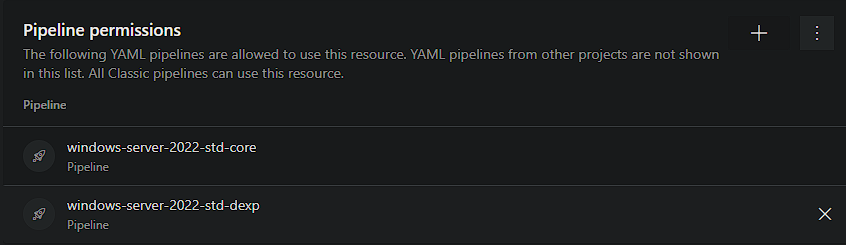
Now back over to the DevOps portal, we can give permissions to each template pipeline to use this service connection. First, click on security.
We can then add the pipelines required.
Azure Key Vault Secrets
Adding Secrets
This Packer configuration consumes a number of secrets within the Pipeline. We will be storing the username and password for the vSphere Service account and Guest OS admin accounts for accessing vSphere as well as building and configuring the VM and the autounattend.xml file. I will go into more detail further down, but here is a link describing how to add a secret to a Vault.
RBAC
To ensure a Pipeline only has access to the secrets it needs, we will be using RBAC permissions per secret using the IAM interface rather than Access Policies.
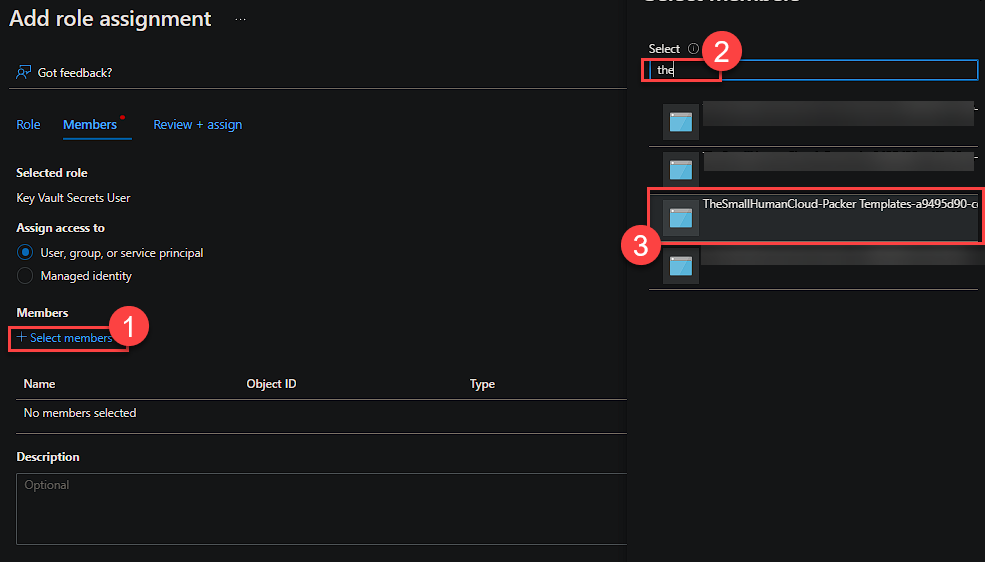
To configure this, select a secret and then open the IAM interface. Select the ‘Key Vault Secret User’ Role and then click members.
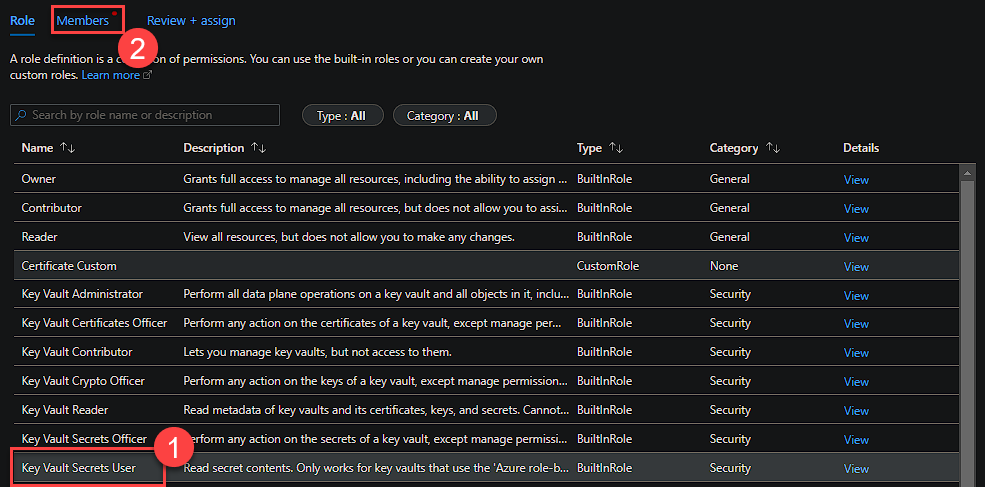
Click’ Select Members’, search for the require service principal and select it, followed by the select option at the bottom.
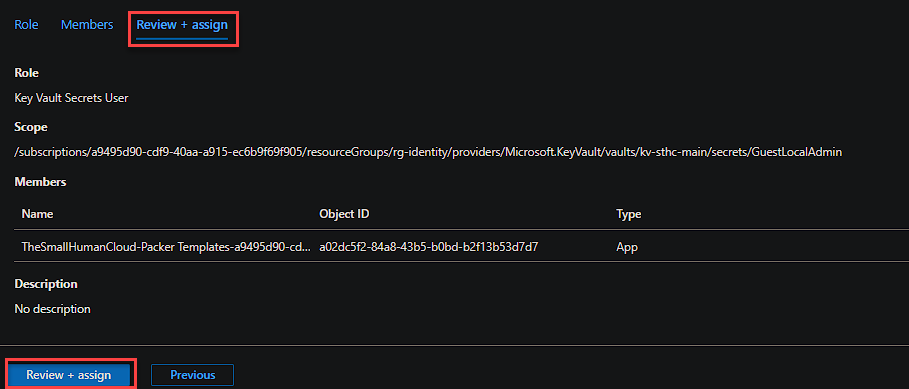
Now click ‘Review + Assign’
Repeat for all secrets required.
You can also use the PowerShell command ‘New-AzRoleAssignment’ rather than using the portal to assign the permissions.
We are granting the ‘Key Vault Secrets User’ role to the Application ID, for each of the required secrets:
1New-AzRoleAssignment -RoleDefinitionName 'Key Vault Secrets User' -ApplicationId <App ID> -Scope /subscriptions/<Subscription ID>/resourcegroups/<Resource Group Name>/providers/Microsoft.KeyVault/vaults/<vault-name>/secrets/<Secret Name>
 1RoleAssignmentId   : /subscriptions/a9495d90-xxxxx-xxxxx-xxxxx-exxxxxxxxxxx/resourcegroups/rg-identity/providers/Microsoft.KeyVault/vaults/kv-vault-name/secrets/GuestLocalAdmin/providers/Microsoft.Authorization/roleAssignments/1b45f2e4-e85a-4723-a4f4-cfd7da11
 2                     5b70
 3Scope              : /subscriptions/a9495d90-xxxxx-xxxxx-xxxxx-xxxxxxxxxxxxx/resourcegroups/rg-identity/providers/Microsoft.KeyVault/vaults/kv-vault-name/secrets/GuestLocalAdmin
 4DisplayName        : TheSmallHumanCloud-Cloud Management-a9495d90-xxxxx-xxxxx-xxxxx-xxxxxxxxxxxxx
 5SignInName         :
 6RoleDefinitionName : Key Vault Secrets User
 7RoleDefinitionId   : 4633458b-17de-408a-b874-0445c86b69e6
 8ObjectId           : ca610efd-xxxxx-xxxxx-xxxxx-xxxxxxx1efa26
 9ObjectType         : ServicePrincipal
10CanDelegate        : False
11Description        :
12ConditionVersion   :
13Condition          :
Required Secrets
The Pipeline Azure Key Vault task described earlier lists a number of secrets that we will require. Here is an overview of the purpose of each:
-
vSphereAdminUser - Active Directory Account with the required permissions in vCenter to be able to provision VM’s and upload to a Content Library etc.
-
vSphereAdmin - Password for the vCenter Account above.
-
GuestLocalAdminUser - Local Admin username (Administrator) for consumption in the Operating System answer file.
-
GuestLocalAdmin - Password for the local admin user.
The next three are for the custom email notification section which I will go into more later.
-
PipelineNotificationsTenantID - Azure Tenant ID.
-
PipelineNotificationsAppID - App Registration ID.
-
PipelineNotificationsAppSecret - App Registration Secret.
Email Notification Setup
The Pipeline makes use of a custom email notification PowerShell function which uses the Graph API’s. See my recent blog post on how to set this up.
Running the Pipeline
We are now ready to run the Pipeline! To kick it off manually, hit the ‘Run Pipeline’ button when in the Pipeline.

Increase the playback quality if the auto settings aren’t allowing you to see the detail!
Now you can head over to your content library and you will see your template. Below are both my Windows Server 2022 builds.
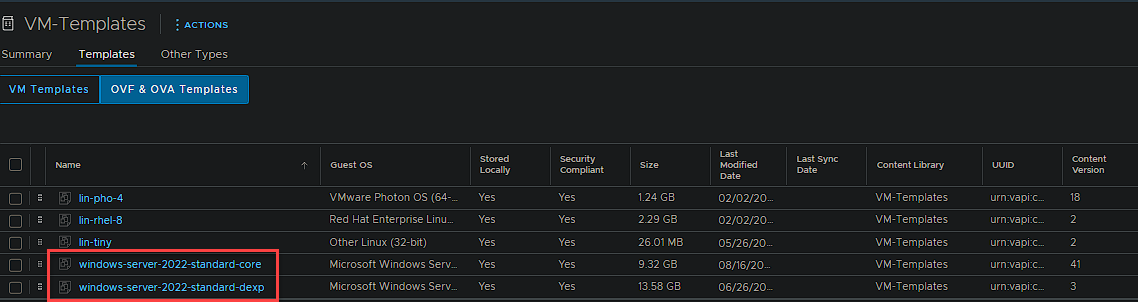
You can tell I use Server 2022 Core to test… Version 41!
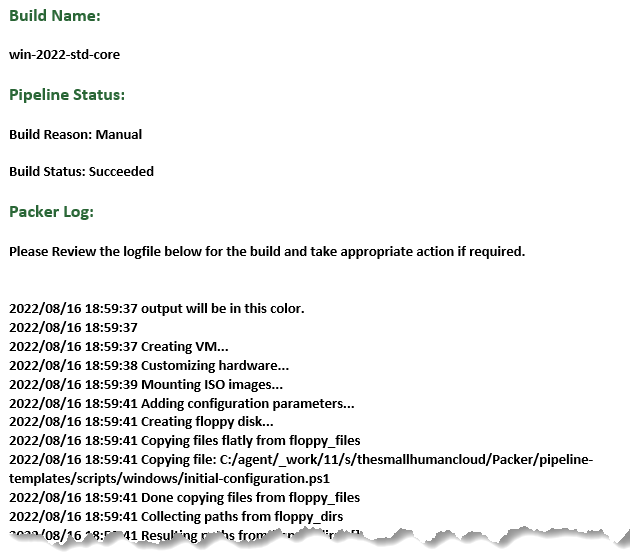
Notification Email
Here is a snippet of the notification email that was sent on completion.
And there you have it. I personally enjoyed seeing how I could make use of both Packer and Azure DevOps to deliver vSphere templates. I hope it helps you with your templating journey!
As always, thanks for reading!
If you like my content, consider following me on Twitter so you don’t miss out!