Recently I decided it was time to add a second vCenter 7.0 Appliance to my main lab environment after the lab containing my SRM and vSphere Replication installation ceased to exist…
I thought I would take the CLI route as its been a while, and thought I’d share!
To begin, you need to decide what you are deploying. There are four deployment options available to you, which you can see listed below. To see the options, mount the vCenter ISO image, browse to vcsa-cli-installer\templates\install, and you will find 4 templates;
- Embedded on ESXi
- Embedded on VC
- Embedded replication on ESXi
- Embedded replication on VC.
Note there is not a distributed option here anymore as this is depreciated in 7.0.
For my lab I will be using the 3rd option; ‘Embedded replication on ESXi’. Firstly because I’m deploying to a standalone host and not to an existing vCenter. Secondly as I already have an existing VCSA and SSO Domain. This new VCSA will be added, or linked to the existing VCSA for my ‘Recovery’ site, in my Site Recovery Manager (SRM) setup.
If you are looking to deploy your first VCSA, onto a standalone host, you will want to use the ‘Embedded on ESXi’ template.
Once you have decided on the template that suits your scenario, you are going to add some details to this template, such as the ESXi host information you are deploying to, networking information, NTP and in my case SSO details as I will be adding it to an existing SSO Domain. One important value is the deployment size (deployment_option in the example below).
A useful command that can be run to help you decide what size appliance is suitable for your needs is:
1vcsa-deploy --supported-deployment-sizes
This outputs the vCenter sizing to assist you. It shows you the resource requirements as well as the amount of hosts and VM’s each can support.
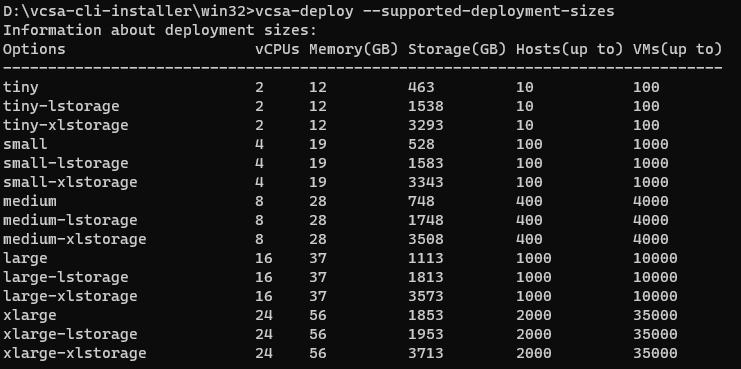
For my lab, ’tiny’ covers my needs.
Here is the json file I used for the deployment in my lab. I have excluded the passwords for obvious reason, but it can be ran like this, and will prompt you for the passwords in the terminal.
 1{
 2    "__version": "2.13.0",
 3    "__comments": "Sample template to deploy a vCenter Server Appliance with an embedded Platform Services Controller as a replication partner to another embedded vCenter Server Appliance, on an ESXi host.",
 4    "new_vcsa": {
 5        "esxi": {
 6            "hostname": "smt-lab-esx-04.smt-lab.local",
 7            "username": "root",
 8            "password": "",
 9            "deployment_network": "vSS_PG_Management",
10            "datastore": "smt-lab-vmfs-02a"
11        },
12        "appliance": {
13            "__comments": [
14                "You must provide the 'deployment_option' key with a value, which will affect the VCSA's configuration parameters, such as the VCSA's number of vCPUs, the memory size, the storage size, and the maximum numbers of ESXi hosts and VMs which can be managed. For a list of acceptable values, run the supported deployment sizes help, i.e. vcsa-deploy --supported-deployment-sizes"
15            ],
16            "thin_disk_mode": true,
17            "deployment_option": "tiny",
18            "name": "smt-lab-vcsa-02"
19        },
20        "network": {
21            "ip_family": "ipv4",
22            "mode": "static",
23            "system_name": "smt-lab-vcsa-02.smt-lab.local",
24            "ip": "10.200.15.249",
25            "prefix": "24",
26            "gateway": "10.200.15.254",
27            "dns_servers": [
28                "10.200.15.10"
29            ]
30        },
31        "os": {
32            "password": "",
33            "ntp_servers": "0.uk.pool.ntp.org",
34            "ssh_enable": true
35        },
36        "sso": {
37            "password": "",
38            "domain_name": "vsphere.local",
39            "first_instance": false,
40            "replication_partner_hostname": "smt-lab-vcsa-01.smt-lab.local",
41            "sso_port": 443
42        }
43    },
44    "ceip": {
45        "description": {
46            "__comments": [
47                "++++VMware Customer Experience Improvement Program (CEIP)++++",
48                "VMware's Customer Experience Improvement Program (CEIP) ",
49                "provides VMware with information that enables VMware to ",
50                "improve its products and services, to fix problems, ",
51                "and to advise you on how best to deploy and use our ",
52                "products. As part of CEIP, VMware collects technical ",
53                "information about your organization's use of VMware ",
54                "products and services on a regular basis in association ",
55                "with your organization's VMware license key(s). This ",
56                "information does not personally identify any individual. ",
57                "",
58                "Additional information regarding the data collected ",
59                "through CEIP and the purposes for which it is used by ",
60                "VMware is set forth in the Trust & Assurance Center at ",
61                "http://www.vmware.com/trustvmware/ceip.html . If you ",
62                "prefer not to participate in VMware's CEIP for this ",
63                "product, you should disable CEIP by setting ",
64                "'ceip_enabled': false. You may join or leave VMware's ",
65                "CEIP for this product at any time. Please confirm your ",
66                "acknowledgement by passing in the parameter ",
67                "--acknowledge-ceip in the command line.",
68                "++++++++++++++++++++++++++++++++++++++++++++++++++++++++++++++"
69            ]
70        },
71        "settings": {
72            "ceip_enabled": true
73        }
74    }
75}
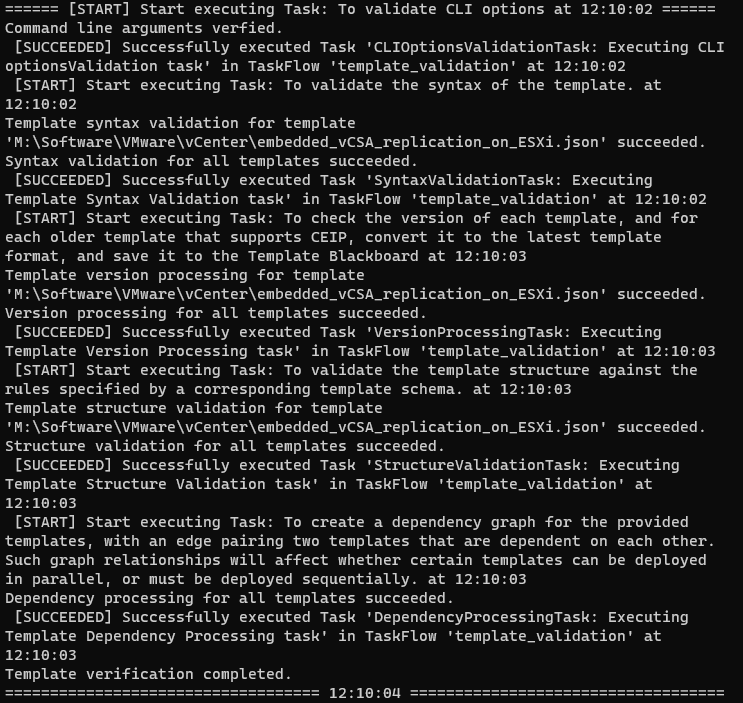
Once you have prepared your file, there are a couple of commands you can run from a PowerShell prompt to validate your configuration before deploying, saving you some time should mistakes have been made. The first being:
1.\vcsa-deploy.exe install --accept-eula --acknowledge-ceip --verify-template-only <Path to json File>
This completes some basic checks to ensure your json file is correct, here is a successful output:
Secondly:
1.\vcsa-deploy.exe install --accept-eula --acknowledge-ceip --precheck-only <Path to json File>
This will perform a more in depth validation, checking things like the credentials for your SSO domain, DNS or whether the IP or name you plan to use for your VCSA is in use already.
Note: Make sure you have your DNS setup correctly and is resolving the appliance FQDN!
It will also provide warnings if it thinks you might not be using an appropriate template. I originally specified a host what was already managed by vCenter, so it warned me like so:

You will get a similar output to the first command, should you pass all the tests. If not you will need to look at resolving them to ensure you get a successful deployment.
The Install!
Once you are confident you have everything in place, including DNS, and your configuration files are correct, you are ready to install:
1.\vcsa-deploy.exe install --accept-eula --acknowledge-ceip --no-ssl-certificate-verification <Path to json File>
Here is a cut down version of the output you will see during the deployment:
 1 ====== [START] Start executing Task: To validate CLI options at 12:46:25 ======
 2 Command line arguments verfied.
 3  [SUCCEEDED] Successfully executed Task 'CLIOptionsValidationTask: Executing CLI
 4 optionsValidation task' in TaskFlow 'template_validation' at 12:46:26
 5  [START] Start executing Task: To validate the syntax of the template. at
 6 12:46:27
 7 Template syntax validation for template
 8 'M:\Software\VMware\vCenter\embedded_vCSA_replication_on_ESXi.json' succeeded.
 9 Syntax validation for all templates succeeded.
10
11 ====== [START] Start executing Task: Perform precheck tasks. at 12:46:39 ======
12  [START] Start executing Task: Verify that the provided credentials for the
13 target ESXi/VC are valid at 12:46:45
14 The certificate of server 'smt-lab-esx-04.smt-lab.local' will not be verified
15 because you have provided either the '--no-ssl-certificate-verification' or
16 '--no-esx-ssl-verify' command parameter, which disables verification for all
17 certificates. Remove this parameter from the command line if you want server
18 certificates to be verified.
19
20 ================== [START] Start executing Task:  at 12:47:47 ==================
21 = [SUCCEEDED] Successfully executed Task '' in TaskFlow 'install' at 12:47:47 =
22  [START] Start executing Task: Check whether the datastore's free space
23 accommodate the VCSA's deployment option at 12:47:51
24  [SUCCEEDED] Successfully executed Task 'Running precheck: TargetDsFreespace' in
25 TaskFlow 'install' at 12:47:51
26
27 ==========VCSA Deployment Progress Report==========         Task: Install
28 required RPMs for the appliance.(RUNNING 5/100)   - Setting up storage
29 VCSA Deployment is still running
30
31 ==========VCSA Deployment Progress Report==========         Task: Install
32 required RPMs for the appliance.(SUCCEEDED 100/100)       - Task has completed
33 successfully.         Task: Run firstboot scripts.(SUCCEEDED 100/100) - Task has
34 completed successfully.
35 Successfully completed VCSA deployment.  VCSA Deployment Start Time:
36 2020-12-28T13:19:19.291Z VCSA Deployment End Time: 2020-12-28T14:18:27.103Z
37  [SUCCEEDED] Successfully executed Task 'MonitorDeploymentTask: Monitoring
38 Deployment' in TaskFlow 'embedded_vCSA_replication_on_ESXi' at 14:18:45
39 Monitoring VCSA Deploy task completed
40 The certificate of server 'smt-lab-vcsa-02.smt-lab.local' will not be verified
41 because you have provided either the '--no-ssl-certificate-verification' or
42 '--no-esx-ssl-verify' command parameter, which disables verification for all
43 certificates. Remove this parameter from the command line if you want server
44 certificates to be verified.
45 == [START] Start executing Task: Join active domain if necessary at 14:18:59 ==
46 Domain join task not applicable, skipping task
47  [SUCCEEDED] Successfully executed Task 'Running deployment: Domain Join' in
48 TaskFlow 'embedded_vCSA_replication_on_ESXi' at 14:18:59
49  [START] Start executing Task: Provide the login information about new
50 appliance. at 14:19:10
51     Appliance Name: smt-lab-vcsa-02
52     System Name: smt-lab-vcsa-02.smt-lab.local
53     System IP: 10.200.15.249
54     Log in as: [email protected]
55  [SUCCEEDED] Successfully executed Task 'ApplianceLoginSummaryTask: Provide
56 appliance login information.' in TaskFlow 'embedded_vCSA_replication_on_ESXi' at
57 14:19:10
58 =================================== 14:19:16 ===================================
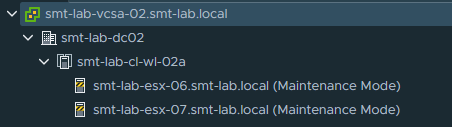
Once complete, you will now have a second vCenter appliance deployed in Linked mode with the original. Here it is once I had configured a datacenter and cluster with two hosts.
And there you have it, thanks for reading!