Configuring host VMKernel adapters for iSCSI can be a time consuming process. PowerCLI can take away a lot if not all of the effort.
Below is an example of using PowerCLI to create a Standard Virtual Switch (vSS), configure a VMKernel adapter, set the VLAN, enable the software iSCSI adapter (if that’s what you are using), bind it to the required network adapter and finally, add a dynamic Discovery target and rescanning the HBA’s.
This is based on targeting a single host at a time and re-running it with the paramaters for each host.
 1#Load PowerCLI Modules
 2Import-module VMware.PowerCLI
 3
 4#Variables
 5#vCenter or Host to Connect to
 6$vCenter = "smt-lab-vcsa-01.smt-lab.local"
 7#ESX Host to target
 8$ESXHost = Get-VMHost "smt-lab-esx-01.smt-lab.local"
 9#Name of the iSCSI Switch
10$iSCSISwitchName = "vSS_Storage_iSCSI"
11#vmnic to be used for iSCSI Switch
12$iSCSISwitchNIC = "vmnic2"
13#MTU size
14$MTU = "9000"
15#Name of the Portgroup for the VMKernel Adapter
16$iSCSIVMKPortGroupName = "vSS_VMK_iSCSI_A"
17#iSCSI VMK IP
18$iSCSIIP = "10.200.33.50"
19#iSCSI VMK SubnetMask
20$iSCSISubnetMask = "255.255.255.0"
21#iSCSI VMK VLAN ID
22$VLANID = "300"
23#iSCSI Portal Target
24$Target = "10.200.33.1:3260"
25
26#Connect to vCenter
27Connect-VIServer $vCenter -Credential (Get-Credential) -Force
28
29#New Standard Switch for iSCSI
30$NewSwitch = New-VirtualSwitch -VMHost $ESXHost -Name $iSCSISwitchName -Nic $iSCSISwitchNIC -Mtu $MTU
31$NewPortGroup = New-VMHostNetworkAdapter -VMhost $ESXHost -PortGroup $iSCSIVMKPortGroupName -VirtualSwitch $NewSwitch -IP $iSCSIIP -SubnetMask $iSCSISubnetMask -Mtu $MTU
32Set-VirtualPortGroup -VirtualPortGroup (Get-virtualPortGroup -VMhost $ESXHost | Where {$_.Name -eq $iSCSIVMKPortGroupName}) -VLanId $VLANID
33
34#Enable Software iSCSI Adapter
35Get-VMHostStorage -VMHost $ESXHost | Set-VMHostStorage -SoftwareIScsiEnabled $True
36
37#Bind the iSCSI VMKernel Adapter to Software iSCSI Adapter (credit to Luc Dekens for this)
38$esxcli = Get-EsxCli -V2 -VMHost $ESXHost
39$bind = @{
40    adapter = ($iscsiHBA = $ESXHost | Get-VMHostHba -Type iScsi | Where {$_.Model -eq "iSCSI Software Adapter"}).Device
41    force = $true
42    nic = $NewPortGroup.Name
43}
44$esxcli.iscsi.networkportal.add.Invoke($bind)
45
46#Add Dynamic Discovery Target
47$ESXHost | Get-VMHostHba $iscsiHBA | New-IScsiHbaTarget -Address $Target
48
49#Rescan Hba
50Get-VMHostStorage -VMHost $ESXHost -RescanAllHba
The results -


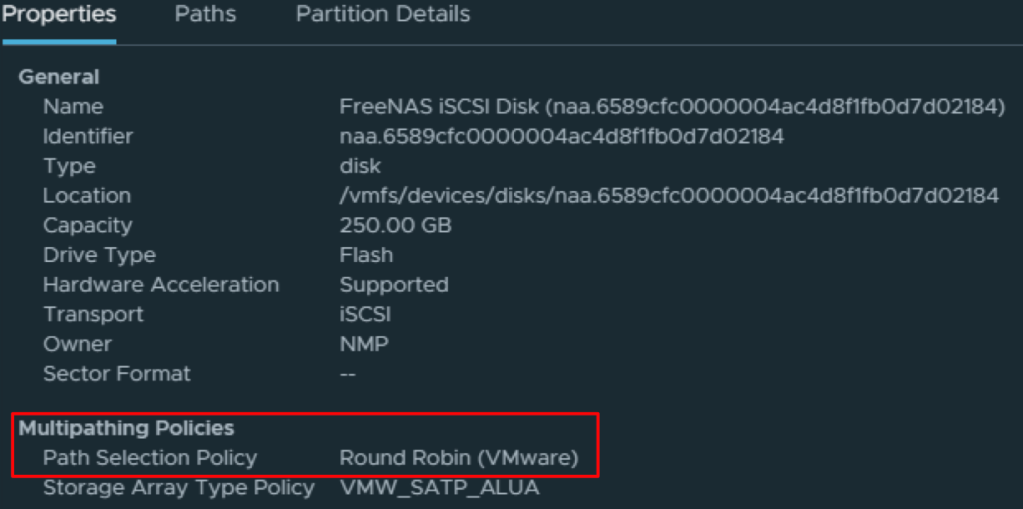
Something you may also want to do is set the Path Selection Policy (PSP) to the commonly used; ‘Round Robin’. The first command will provide a list of attached storage, showing you the CanonicalName (which is what you need for the second command), the current Multipathing Policy and the size of the storage device.
Identify the device you wish to set the pathing policy on and substitute the Canonical Name (naa.xxxx) into the second command.
1#Get storage
2$esxhost | Get-ScsiLun -LunType disk | Select CanonicalName,MultipathPolicy, CapacityGB
3
4#Set Path Selection Policy (PSP)
5$esxhost | Get-ScsiLun -LunType disk -CanonicalName naa.6589cfc0000004ac4d8f1fb0d7d02184 | Set-ScsiLun -MultipathPolicy "RoundRobin"
You could of course take this further by importing all the data required for multiple hosts using an array, whether as a a manually created array in PowerShell, or by importing a csv or txt file to enable you to configure numerous hosts at once by making use of a ForEach loop.
Now, if you are using Virtual Distributed Switches (vDS), here is an alternative (I have assumed you already have an operational vDS in place).
 1#Load PowerCLI Modules
 2Import-module VMware.PowerCLI
 3
 4#Variables
 5#vCenter or Host to Connect to
 6$vCenter = "smt-lab-vcsa-01.smt-lab.local"
 7#ESX Host to target
 8$ESXHost = Get-VMHost "smt-lab-esx-02.smt-lab.local"
 9#Name of the vDS
10$iSCSISwitchName = "smt-lab-dc01_vDS_01"
11#Name of the Portgroup for the VMKernel Adapter
12$iSCSIVMKPortGroupName = "smt-lab-dc01_vDS_VMK_iSCSI_B"
13#MTU size
14$MTU = "9000"
15#iSCSI VMK IP
16$iSCSIIP = "10.200.34.51"
17#iSCSI VMK SubnetMask
18$iSCSISubnetMask = "255.255.255.0"
19#iSCSI VMK VLAN ID
20$VLANID = "301"
21#iSCSI Portal Target
22$Target = "10.200.34.1:3260"
23
24Connect-VIServer $vCenter -Credential (Get-Credential) -Force
25
26#New VMKernel Adapter on vDS
27$NewPortGroup = New-VMHostNetworkAdapter -VMhost $ESXHost -PortGroup $iSCSIVMKPortGroupName -VirtualSwitch $iSCSISwitchName -IP $iSCSIIP -SubnetMask $iSCSISubnetMask -Mtu $MTU
28Set-VDPortGroup -VDPortgroup (Get-VDPortGroup | Where {$_.Name -eq $iSCSIVMKPortGroupName}) -VLanId $VLANID
29
30#Bind iSCSI VMKernel Adapter to Software iSCSI Adapter (credit to Luc Dekens for this)
31$esxcli = Get-EsxCli -V2 -VMHost $ESXHost
32$bind = @{
33    adapter = ($iscsiHBA = $ESXHost | Get-VMHostHba -Type iScsi | Where {$_.Model -eq "iSCSI Software Adapter"}).Device
34    force = $true
35    nic = $NewPortGroup.Name
36}
37$esxcli.iscsi.networkportal.add.Invoke($bind)
38
39#Add Dynamic Discovery Target
40$ESXHost | Get-VMHostHba $iscsiHBA | New-IScsiHbaTarget -Address $Target
41
42#Rescan Hba
43Get-VMHostStorage -VMHost $ESXHost -RescanAllHba
A slight change to the cmdlts used; PortGroup > VDPortGroup.
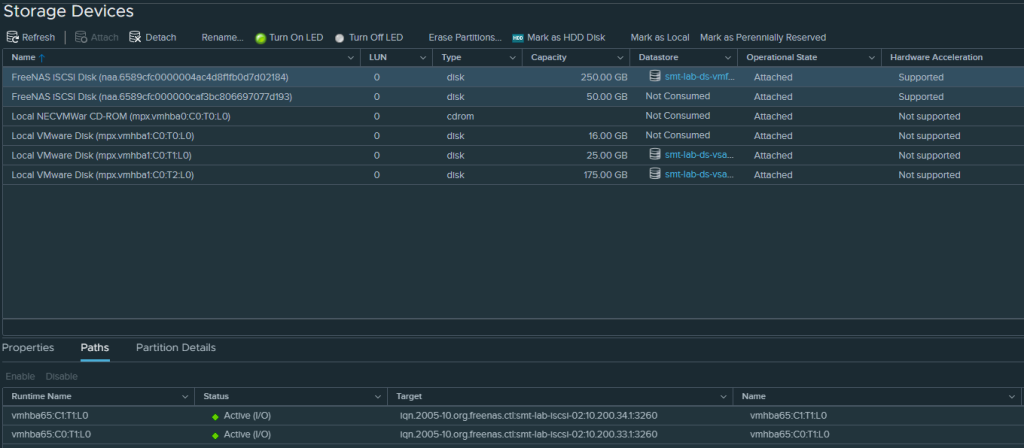
Here are the results -
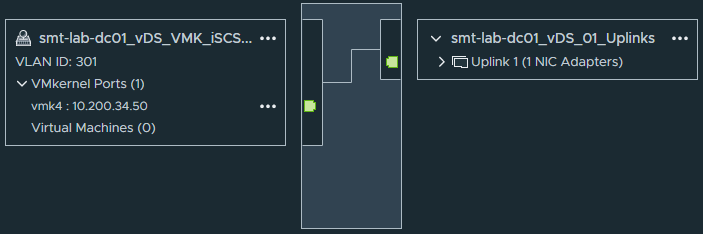


There are now two paths to my iSCSI device, one via a Standard Switch (vSS) and one via a Distributed Switch (vDS) across two subnets.
Hope this has been helpful. It has saved me plenty of time throughout the countless builds and tear downs of my VMware home lab.
Thanks