A useful thing for a home lab or VMware lab, is a certificate authority. There are Windows based CA’s as well as Linux based and many others. I wanted to take the Linux based route for my home lab to give me some administration time in Linux, being that Windows is my safe place! After a bit of googling, I settled on Easy-RSA as it looked like it would do what I needed in the lab. There are already a few guides out there for this, but this is my take on it for use in my VMware home lab.
I settled on CentOS 8 as a base OS. Why? Why not, I don’t have any Centos VM’s and I decided it would be good to use something other than Ubuntu or Photon.
Firstly, I stood up a low resource VM (1 vCPU, 1GB RAM) giving it a static IP and creating an admin account.
I then kicked off the update of all the install packages on the OS by first elevating to the root account using ‘SU’ and then running the upgrade command for the DNF package manager.
1dnf upgrade
This prompts a ~600MB download after confirming you want to continue. Once the download completes it gets on with upgrading.
Once done, its time to install some additional packages starting with epel-release, easy-rsa and openssl. Lets quickly give some background to each.
epel-release (Extra Packages for Enterprise Linux) is a repository of popular packages which aren’t available by default. easy-rsa is one of the packages in this repository.
easy-rsa This is a utility for managing Public Key Infrastructure(PKI) aka Certificate Authority. Check out some info [here](http://Easy-RSA is a utility for managing X.509 PKI, or Public Key Infrastructure).
openssl A widely used tool, in this case to create Certificate Signing Requests (CSR). I’ll let you read about this here.
Lets get to the install. You can run them as separate installs like this -
1sudo dnf install epel-release
2sudo dnf install easy-rsa
3sudo dnf install openssl
or as a one liner -
1sudo dnf install epel-release easy-rsa openssl
Now for ease of administration, create a directory in the admin users home directory and create a symbolic link so it remains updated. You also want to limit access to your admin user in my case ‘ca_admin’.
1mkdir ~/easy-rsa
2ln -s /usr/share/easy-rsa/3/* ~/easy-rsa/
3chmod 700 /home/ca_admin/easy-rsa
If you’re not familiar with chmod commands, ‘chomd 700’ = Protects a file against any access from other users, while the issuing user still has full access.
Now to initialise your new PKI. Change Directory (cd) to the easy-rsa directory you created in your admin users home directory and run the initialisation command.
1cd ~/easy-rsa
2./easyrsa init-pki
You will get a message showing it is complete and it will state the new pki directory that has been created inside the easy-rsa directory (/home/ca_admin/easy-rsa/pki)
You now need to create and populate a file called ‘vars’ in /home/ca_admin/easy-rsa and populate it with your organisation/lab information. You can achieve this with the vi editor.
1set_var EASYRSA_REQ_COUNTRY "GB"
2set_var EASYRSA_REQ_PROVINCE "Labshire"
3set_var EASYRSA_REQ_CITY "Lab City"
4set_var EASYRSA_REQ_ORG "Home Lab"
5set_var EASYRSA_REQ_EMAIL "[email protected]"
6set_var EASYRSA_REQ_OU "Lab"
7set_var EASYRSA_ALGO "ec"**(or rsa if you wish...)**
8set_var EASYRSA_DIGEST "sha512"
Once created, you are now ready to create the root certificate and private key by running the following command -
1./easyrsa build-ca
You will be prompted to specify a passphrase which you need to keep safe as you will need it when issuing certificates. There will then be a second prompt to provide a common name; Enter you CA’s name. eg. CA01.
This process will have now created your root certificate and the private key (keep this safe). You will find them in the following locations /home/ca_admin.easy-rsa/pki/ca.crt(root certificate) and /home/ca_admin.easy-rsa/pki/private/ca.key (private key).
If you are using a Windows device to access your HomeLab, you are going to want to add the ca.crl file to the ‘Trusted Root Certification Authorities’ store on your Windows device so that any certificates issued are trusted. You can copy the ca.crt file using a tool such as WINSCP to transfer the file to a local directory to then install. You can do the equivalent on Mac and Linux OS’s too.
You will also need this handy for any certificates that require the full chain to be included.
I won’t go into every Certificate Signing Request (CSR) scenario as there are many. I will however, show you the commands needed to produce a certificate from a CSR.
To issue a certificate from a CSR, you will need to copy the .req or .csr file to a directory such as /tmp on your CA server, again using a tool like WINSCP.
You can then run the following commands to import the certificate signing request. The Common name is often the device name or FQDN.
1cd ~/easy-rsa
2./easyrsa import-req /tmp/<csr_file_name>.req <CommonName or FQDN>
3./easyrsa sign-req server <CommonName or FQDN>
The import command will import the .req or .csr file into /home/ca_admin.easy-rsa/pki/reqs (you can’t place the .req directly in here!) which is then processed by the sign-req command, again asking for the passphrase, leaving you with your new certificate in the /home/ca_admin.easy-rsa/pki/issued directory.
You can then use WINSCP again to transfer the file off the CA, and install it on the device or service in which you requested it from.
As always with any root CA, you don’t want it to become compromised. To help with this, keep it turned off when you’re not issuing, or administering your certificates.
I have also not included any Certificate Revocation List details as this isn’t something I need in my lab environment.
Now the VMware bit… below is the process for acquiring the CSR and installing the generated certificate on an ESXi host and a vCenter server using the methods above.
Standalone ESXi Host 6.7
First for a standalone ESXi Host, browse to - Host > Manage > Security & Users > Certificates
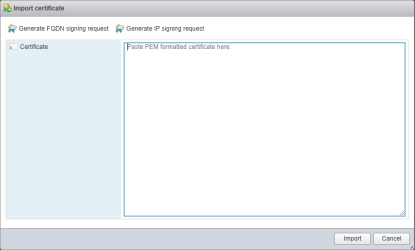
Select Import new certificate then select either ‘Generate FQDN signing request’ or ‘Generate IP signing request’.
You will be presented with a screen like this.
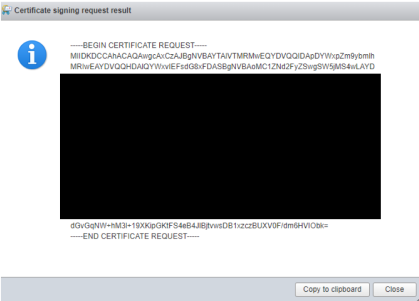
Copy this into a file with the extension .req. This can then be imported and issued using the method above.
Then, go back the the ‘Import new certificate’ wizard and import the certificate in the same format at the CSR into the box. (Open the .crt file using notepad)
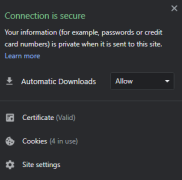
Once complete close and open your browser and head back to your hosts web client and you will see you no longer have a certificate error.
vCenter Server 6.7
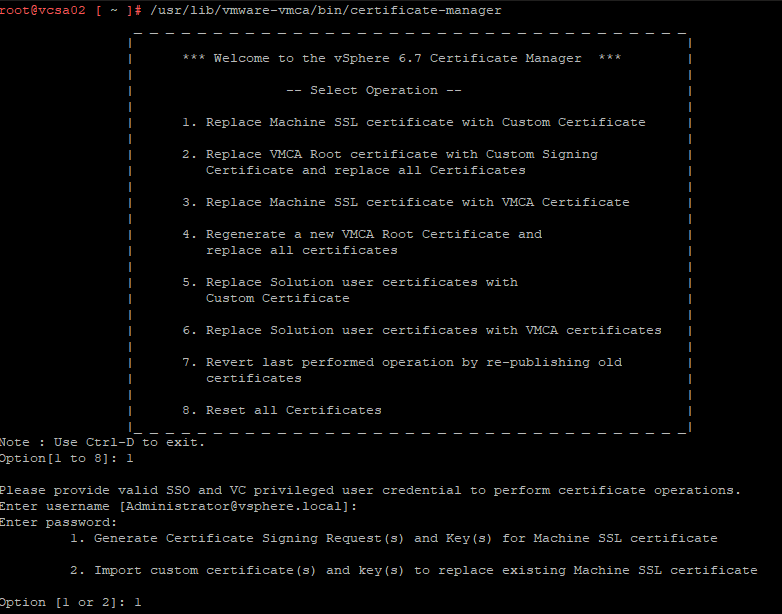
Log into your vCenter appliance using via SSH. Then run the following command -
1/usr/lib/vmware-vmca/bin/certificate-manager
Select option 1, (you will be prompted to provide your SSO credentials), followed by option 1 again.
You will then need to provide the following information for the CSR.
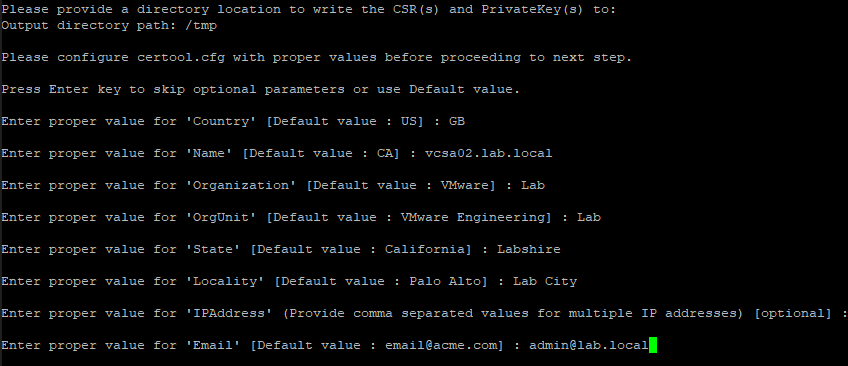
As you complete the wizard you will have a .csr and a .key file in /tmp which again can be issued using the process above.
If using WinSCP you may hit the following error.

You will need to change over to the bash shell.
1chsh -s /bin/bash root
You could then face another error…
1root@vcsa02 [ ~ ]# chsh -s /bin/bash root
2You are required to change your password immediately (password aged)
3chsh: PAM: Authentication token is no longer valid; new one required
This is due to the password expiring. To change the password on the account run the passwd command

Further info on both of these errors can be found at these two VMware Articles. Here and here.
Once you have issued the certificate, you need to then copy the .crt file back to the /tmp directory along with the root certificate (or chain).
Now back to the Certificate Manager. Selecting option 1 to now import the certifictes. You will be prompted to provide the path and file name of each component. The certificate you created, the .key file that was created during the CSR generation and the root or CA chain certificate. Finally you will be asked to confirm you want to replace the Machine SSL certificate, type y.
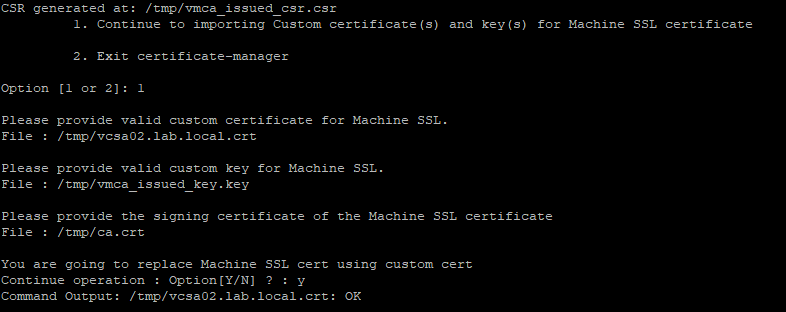
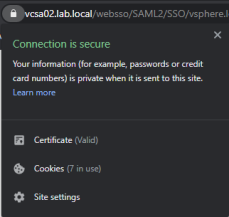
It will take a few minutes, but eventually you will get confirmation that the task is complete and you can then reload your browser to see the Web Client is now showing a valid certificate.

Hope this has been useful. I will cover vCenter 7.0 Machine SSL certificate replacement in a future post.
Thanks for reading!